Tag Archives: bake

Marzipan for Christmas cake

7 Dec

I know there are so many ways to marzipan a cake and everyone has their preferred method. I use a method that is brilliant for any sort of icing whether you’re going for a traditional Royal icing or more modern sugar paste!

marzipan3

Ingredients:
500-1kg Marzipan
5-6tbsp Apricot jam heated

I used a 12 inch cake drum(thick cake board)

Estimated time: 20 minutes

Directions:

To start off with you need to trim your cake making sure it’s level, this might not take much as the cake levels out quite a lot while cooking 🙂 for mine I only had to trim some of the fruit on top 🙂

Once level roll a thin sausage of marzipan long enough to go around the edge of your cake.

Using a pastry brush spread a small amount of the heated jam around the edge before placing the marzipan sausage around the very edge. Once positioned gently press the marzipan down with your thumb roughly every inch around so that it’s stuck.

marzipan1

Carefully take the cake and turn it over so the marzipan is on the bottom and place it in the middle of your cake board and press down so the cake is stuck. As you press down on the cake the marzipan will squish out at the bottom. Flatten this with a palette knife or cake smoother (if you have one!) and then trim the excess off this will cover any gaps so you cake is airtight 🙂

Now take your cake tin and draw around the bottom so you have the size or the top of your cake. You can just use string to get the width and length but this is a lot easier!! Take a large handful of the marzipan and mould it into a rough circle before rolling it. Keep turning the marzipan a quarter each time so it stays in a circle shape. Roll it out to the size of the circle you cut out.

marzipan2

Brush the top of your cake with apricot jam before carefully placing your marzipan on top. I find it easier to fold one edge of the marzipan back over the rolling pin so you can pick it up by the pin, without it sticking to itself and loosing shape! Once placed on the cake you can roll the marzipan out to the edges if it’s a bit small. If too long carefully trim the edges.

Now the sides, if you have any dents fill them with a bit of marzipan so it’s nice and flat. Like before with the cake tin you want to measure the height an width of the sides this time. It doesn’t have to be perfect but the length needs to be a bit over so you know you won’t be short!

Now with the rest of the marzipan roll it into a sausage roughly the same size as your rolling pin.

Lightly dust your surface with icing sugar before you start to roll. I started with the width,once you’ve roughly got the width you can then roll length aways until your marzipan is long enough.

Trim both ends so they’re straight and trim the height if needs be. Now brush the sides of your cake with the apricot jam making sure it’s all covered.

Roll the marzipan gently back on itself so you have a small roll of it. Take the end of the marzipan and place the edge straight against the cake. Now you can gently un roll the marzipan, keeping it straight against the cake.

At the end you will have a bit left over, using a sharp knife cut through the marzipan where the two ends overlap. Peel the underneath bit of marzipan off and stick the top bit down in its place giving you a perfect join!

marzipanchirstmascake

Finally you need to smooth the cake and join the edges with the top. You can use either a cake smoother or your hands for this! Once smooth cover with tin foil and leave for at least a day before icing.

Christmas Cake

28 Nov

It might seem a bit early to make this now but once you’ve made it, covered it with marzipan, then iced it with royal icing or sugar paste and finally decorated it you’ll be way into December! So now is definitely the time! This is my mums family recipe passed down from mums to daughters for generations and I will do the same 🙂

ChristmasCake8

Ingredients:
227g Sultanas
454g Currants
227g Raisins
116g Dates
118g Mixed peel
117g Glacé Cherries
114g Chopped blanched almonds
80ml/ 1/8pt Brandy
227g Butter
227g Muscovado sugar
230g Plain flour
1tsp Mixed spice
1 Lemon zest and juice
4 Eggs

Directions:

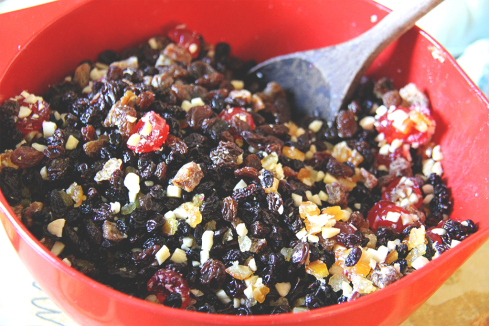
Firstly weigh all of your dried fruits into a bowl with your mixed peel and chopped blanched almonds. I would half the glacé cherries so they can be evenly mixed through the cake! Give this mix a rough stir before pouring the brandy over. Ideally you want to leave this bowl covered with a tea towel over night, but if you’re in a rush then about three hours will suffice 🙂

ChristmasCake1

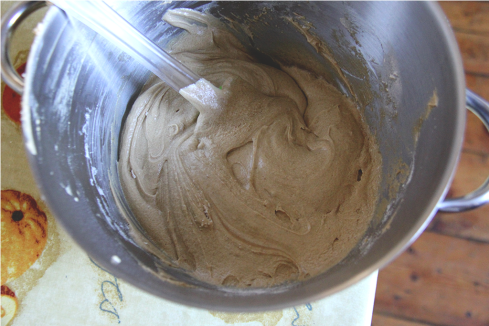
Now weigh your butter and Muscovado sugar into another bowl and cream together until light and fluffy. Obviously as this is dark sugar it will not go as light as normal but there will be a very obvious change in colour!

ChristmasCake5

Once the butter and sugar have been creamed together slowly mix in the eggs, making sure they are fully mixed in before adding the next. The mix will curdle at this point but don’t worry, once the flour is added it will come together.

Now fold the flour in in roughly three parts, making sure that each part is folded in completely before the next.

ChristmasCake2

Now to line the tin…this is more fiddly than normal cakes! First you’ll need some string, measure the string around the tin and mark a small bit over so there is some extra room. With this string measure the length of great proof paper, you want to trim the top so it will be a few inches above the tin edges. Once this is measured, draw around the bottom of the tin on another piece of greaseproof.

ChristmasCake3

Fold the bottom of the paper up about an inch and cut tabs all along the bottom. Now carefully place the paper into the greased tin and arrange it so that the tabs fold into the middle and you can press the sides out so it’s stuck to the tin.

ChristmasCake4

Once the sides are lined place the circle paper in the bottom so every bit of the tin is covered.

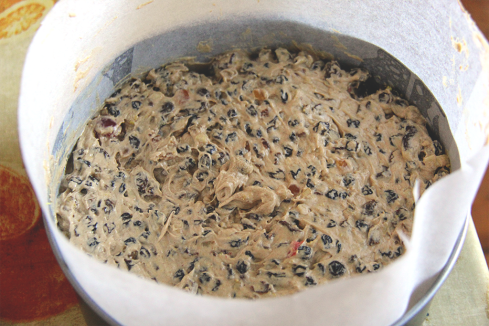
Take your dried fruit and give them a rough stir before folding them into the cake mix. Make sure you add in the lemon juice and zest as well, once all mixed pour into the cake tin and smooth the top.

ChristmasCake6

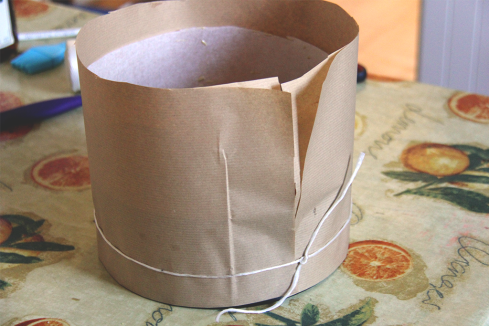
Now you need some brown parcel paper, or if needs be you can use a wider bit of greaseproof paper. Measure the length using the string from earlier and cut a bit extra so it will definitely fit round. This time you don’t need to fold the bottom or cut it you just have to wrap it around the outside of the tin and tie it tight with the string.

ChristmasCake7

Place this doubly wrapped cake into the oven and bake at 180c for 3 and 1/4 hours. Once the cake is ready the top will be browned and a skewer will come out clean, place on a cooling wrack to cool. Once it’s cooled take it out of the tin and wrap it in greaseproof followed by tin foil and leave for a few days before trying to marzipan it!

ChristmasCake

This cake smells amazing and will make you want to eat it as soon as it’s out of the oven! It’s such a tease having to leave it for a few days but it is so worth it, this cake finished for Christmas is just amazing! I hope you love this cake, you can always use it for any other occasion cake you want!!

Toffee Apple Cake

9 Nov

My last taste of Halloween! This cake takes you back to eating toffee apples on Halloween with friends and family. This is a wonderfully soft apple cake smothered in sweet sticky toffee going together brilliantly! This cake says bye to Halloween but embraces autumn and leads nicely on to the festive spirit!!!

ToffeeAppleCake4

Ingredients:
5 Bramley apples
1 Lemon juiced
50g Caster sugar
150g Caster sugar
1tsp Vanilla essence
5 Eggs
300g Plain flour
1tsp Baking powder
150g Melted butter

62g Butter
30ml Semi skimmed milk
112g Muscovado sugar

Estimated time: 60 minutes

Directions:

Weigh your 50g of caster sugar into a large bowl. Squeeze the lemon juice into this bowl. To make sure you don’t get any pips in the sugar place a sieve over the bowl to catch them, or you can squeeze the juice out into a separate bowl 🙂 stir these together and set aside.

Now peel your apples, if you don’t have Bramley (cooking) apples then Grannysmiths will be fine. You don’t want anything to sweet or you’ll loose the flavour while it cooks! Once peeled cut the apples into quarters and cut the core out. Roughly chop the apple pieces into bite size chunks before adding them to the lemon and sugar mix. Give them a stir to make sure they’re all covered as the lemon juice will stop the apples oxidising and going brown, give them a stir every so often 🙂

ToffeeAppleCake1

Now weigh the rest of the caster sugar into a mixing bowl and slowly stir in the melted butter.

To this stir in the vanilla and then mix in the eggs one at a time. Make sure they are well mixed in before adding the next. This will make it a lighter orange 🙂

ToffeeAppleCake2

Weigh your flour and baking powder together before carefully folding this into your sugar. Try not to knock any air out, but be careful so you’re not left with lumps!

Now pour your apples and all the lemon juice into your mixing bowl and fold these in before pouring the cake mix into a lined tin.

ToffeeAppleCake3

Bake the cake at 180c for 35-40minutes until the top is nice and gold and a skewer comes out clean. Allow this to cool slightly in its tin before putting on a serving plate.

While the cake is cooling weigh your butter, milk and Muscovado into a saucepan.

Slowly heat this until everything melts. Once melted bring it all up to the boil and stir constantly for 3 minutes.

When the 3minutes is up pour your toffee on top of your cake making sure all of it’s covered!

ToffeeAppleCake

Now cut and enjoy!! This sticky moist apple cake is so amazingly tasty and a wonderful end to Halloween! Everyone will love this cake it’s so more-ish and delicious as a pudding with cream or cold with a nice mug of tea 🙂 enjoy everyone!!!

Soul Cakes

31 Oct

These are really tasty treats which are traditional Halloween cakes. They were originally from the Celtic festival of Samhain where they were baked and left on the doorstep with milk or wine for the departed! The next day the children and poor would dance and beg for the treats, this then because trick or treat!!

SoulCakes

Ingredients:
375g Plain flour
2tsp Ground nutmeg
2tsp Mixed spice
185g Butter
180g Sultanas
1 Egg
125ml Milk

300g White chocolate
400-500ml Double cream

Estimated time: 50 minutes

Directions:

Weigh all of your dry ingredients into a bowl with the butter. Rub this together until the mix resembles bread crumbs 🙂

SoulCakes1

Once crumbs have been reached stir in your sultanas before making a well in the middle of the bowl.

Pour your milk and egg into the well and carefully mix together. Mix this until firm dough forms, this not be too stick and you’ll find that it won’t stick to your fingers!

SoulCakes2

Spoon this dough onto lined trays using tablespoons, make sure you leave them spaced apart. Once all the mix is spooned onto the trays you can shape them into rough ghost shapes, don’t worry if they don’t look too much like ghosts as they will spread a bit while cooking!

SoulCakes3

Bake these in the oven at 220c for 10-15 minutes until kind of puffed up and golden brown. Allow them to cool down on a rack.

SoulCakes5

Meanwhile the ganache. Weigh your white chocolate into a bowl. Pour half of the cream into another microwaveable bowl and heat it until boiling hot. Once hot enough pour the cream on top of your chocolate and stir in, the chocolate should all melt, if not then simply heat up more cream and stir it in until you’re left with a nice smooth paste.

SoulCakes4

Now spoon your ganache over all of your ghosts, the ganache will get thicker as it cools down! Once covered you can decorate your ghosts giving them fun spooky faces!

SoulCakes6

And now enjoy!! These are such tasty things, a mix between biscuits and scones a treat to be enjoyed by everyone on this spooky day! Hope you all love these and have a spooky Halloween!!!

Pumpkin Pie

26 Oct

I love pumpkin pie so much, this is possibly my favourite pudding ever!! The first time I ever tried this was when one of my brothers went to his friends Halloween party and brought some back. The flavour of pumpkin and nutmeg is just brilliant. Served hot or cold this is such an awesome autumn treat for everyone!

PumpkinPie

Ingredients:
350g Plain flour
1tsp Ground cinnamon
200g Butter
150ml Cold water

1000g Pumpkin purée
410g(1tin) Evaporated milk
2 Eggs
170g Muscovado
1tsp Ground cinnamon
1tsp Ground nutmeg
1tsp Ground ginger

Estimated time: 65 minutes

Directions:

Pastry first 🙂 weigh your flour, cinnamon and butter into a bowl and either rub together by hand, or use a mixer. Once the mix resembles bread crumbs slowly add cold water, mix this together until a dough forms. If it’s too dry add a bit more water! Wrap this pastry in cling film and leave in the fridge for 15 minutes.

PumpkinPie1

Meanwhile peel and chop your pumpkin, scraping out the seeds and stringy bits. Weigh your pumpkin into a large saucepan and fill with water, just enough so the chunks are covered. Bring this to the boil and then simmer for about 10 minutes or until the pumpkin is tender.

Drain the water and mash the pumpkin chunks in a big bowl. Drain off any excess water that appears. Leave the pumpkin to one side to cool a bit.

PumpkinPie2

In another bowl weigh your evaporated milk, sugar and spices, mix in the two eggs making sure everything is well mixed. This mix will smell amazing!! Make sure it’s well mixed before stirring in your mashed pumpkin.

By now the pastry will be rested but not too hard so rolling it will still be easy. Take the pastry and roll it out on a floured surface to roughly half a cm thick. Make sure you roll enough to cover your pie tin!

PumpkinPie3

Carefully roll the pastry onto the rolling pin (don’t press down on the pin or you will just roll the pastry into itself!) and place it over your greased pie tin. Gently press the pastry into the edges and sides so that there are no holes.

Pour the pumpkin pie mix into the pastry case, as full as you can safely get it before putting it into the oven at 180c for 40-45 minutes. The pie is done when a knife or skewer comes out clean.

PumpkinPie4

Serve this with cream or ice cream, hot or cold! I hope you all love this autumny pie as much as my family do, it is such a treat and everyone falls in love with it, it makes you enjoy the fact that the nights are getting colder and darker! And let’s face it, everyone loves a bit of pie!!! Enjoy everyone 🙂

Toasted Pumpkin Seeds

23 Oct

Stuck with left over pumpkin seeds?! I know how you feel, it seems a waste to chuck them but no idea what to do with them, happens all the time! But not anymore, just by adding some cinnamon, and other spices these can easily become you’re new favourite snack!!

RoastedPumpkinSeeds3

Ingredients:
Pumpkin seeds from one pumpkin
1 1/2tsp Ground cinnamon
1tsp Nutmeg
1tsp Mixed spice
2tbsp Vegetable oil

Estimated time: 15minutes

Directions:

First the gross bit, you need to clean/wash the pumpkin seeds. Unfortunately the easiest way is to rinse in water and dry, or lay down on a tea towel to remove any bits of pumpkin.

RoastedPumpkinSeeds1

Put the seeds into a small bowl and stir in the vegetable oil, make sure all of the seeds are coated.

Weigh out your spices into another bowl and mix well before stirring onto your pumpkin seeds. Give these a good stir so that they’re evenly coated.

RoastedPumpkinSeeds2

Spread the seeds onto a tray lined with baking paper and bake in the oven at 170c for 10-12 minutes. Check the seeds after 5 minutes and give them a stir. The seeds will become a light golden colour when they are cooked and will be crunchy.

Allow the seeds to cool before eating! These will keep for ages in an airtight container and will be ready for any late night snacking or parties you might have!! These are also brilliant to cover cakes with, especially pumpkin cakes 🙂

RoastedPumpkinSeeds3

I hope you all love these tasty things, they are so easy and can have the flavour changed easily just by using different spices! Enjoy everyone!! 🙂