Tag Archives: Chocolate

Chocolate and Courgette Cake

10 Aug

“Courgette?!” I hear you say, crazy I know 🙂 this cake is such a lovely moist chocolatey cake you won’t even remember that courgette is in it! I found this cake about a year ago at work, with so,e changes and additions it soon became a favourite of mine! So here it is 🙂

ChocolateandCourgette

Ingredients:
170g Butter
375g Caster sugar
300g Plain flour
50g Cocoa powder
3 Eggs
1 Zested orange
375g Grated courgette
5tsp Baking powder
3tsp Bicarbonate of soda
1tsp Ground cinnamon

Estimated time: 60 minutes

Directions:

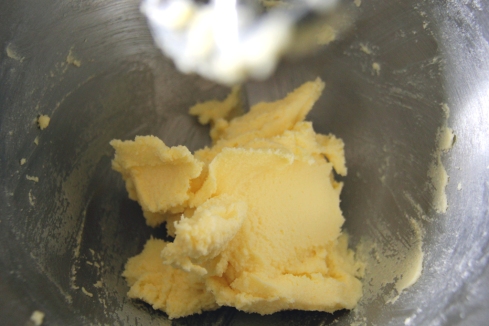
Into a mixing bowl weigh your butter, sugar and add your orange zest. Cream all of these together until lighter in colour and fluffy looking 🙂 this should take a few minutes!

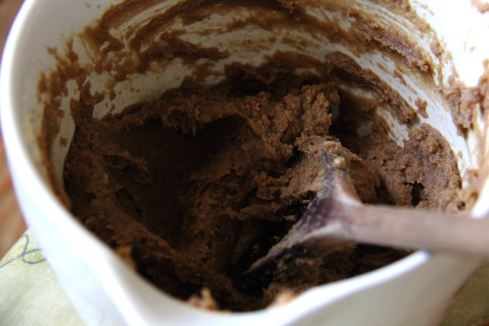
To this slowly add your eggs 1 at a time, making sure the first egg is fully incorporated before adding the second. At the end of this the mix will look curdled, don’t worry this will go away when you add your dry ingredients.

ChocolateandCourgette1

Now wash and weigh the courgettes, make sure you weigh about 50-100g more than needed as the weight will go down once you have cut the ends off. don’t worry about peeling them, just grate them starlight away. The skin will not affect the flavour of the cake!Once this is done mix the courgette into your cake mix.

ChocolateandCourgette2

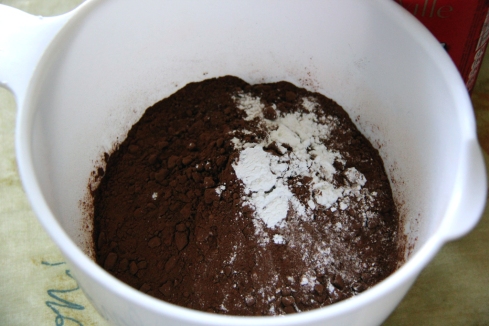
Weigh all of your dry ingredients into another bowl together. Slowly fold this into the cake mix a bit at a time making sure you fold air in, not knock it out!

Once all of the flour has been folded in pour your mix into a lined cake tin and bake in the oven at 180c for 40-50 minutes. When the cake is done a skewer will come out clean.

Allow the cake to cool before sprinkling with icing sugar to finish and topping with fresh orange peel, this really gives it a fresh and colourful look 🙂

ChocolateandCourgette

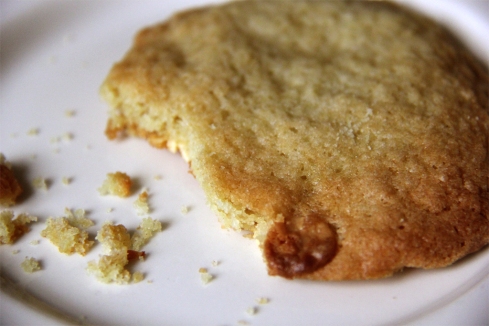
And eat it! This is definitely a cake that you will all love, and if you can’t wait for it to cool down, don’t worry it’s amazing warm as well, or hot with ice cream/custard. This is a truly wonderful cake and I hope you all enjoy it 🙂

Mars Roads

27 Jul

Now who can honestly say they don’t like krispie cakes? I don’t believe that anyone can:p these aren’t just ordinary krispie cakes, these are mars bar rocky road krispie cakes!!! They’re a whole different league to your oral rocky roads! When I was younger I used to think these were the best cakes ever, me and my brothers used to make them all the time. As I got older they kind of disappeared until I made rocky roads at work! My word have I missed these crazy cakes, I love refunding a childhood cakes and adding new flavours to them!

MarsRoads

Ingredients:
10 Mars bars
250g Butter
260g Rice Krispies (1 box)
150g Sultanas
150g Fresh chopped cherries
500g Amaretti biscuits
500g Marshmallows

Estimated time: 120 minutes

Directions:

Weigh your butter into a heat proof bowl along with your ten mars bars, place this bowl over a pan of boiling water and start to melt them together. This will take quite a long time!

MarsRoads1

While these are slowly melting together, empty your Rice Krispies into a large bowl with your sultanas.

Chop your cherries in half and then quarters, making it easier to get the pips out. Mix these into the Rice Krispies before crumbling the amaretti biscuits on top. You don’t have to use amaretti biscuits, I just feel it adds another depth of flavour, slightly more sophisticated than your average biscuits :p

Now check your mars bars, by now the butter should have melted and most of the chocolate leaving you with lumpy bits of nougat. Take this off the heat and pour the water away. Scrape the melted chocolatey goodness into the saucepan and place back on to the heat. Make sure you keep stirring this as the nougat will try its hardest to stick to the pan. Doing it this way means that the nougat will melt faster than in the Bain Marie, but is less likely to burn than just using a saucepan from the off!

MarsRoads2

Once this has all melted in to gooey goodness pour over the Rice Krispies and carefully stir/fold this all together. As soon as its half mixed add the cherries. The moisture from these will help the chocolate coat everything and also help to cool it down enough to stir in marshmallows 🙂

Line two deep trays with grease proof paper before finally mixing the marshmallows through the mix. Now spoon the mix equally ingot he two trays and press/smooth out to the edges. Place these in the fridge until set, depending on the thickness of the rocky roads, this can take from 20 mins to and hour!

MarsRoads

Now cut them and get fat!! These are so more ish and everyone will love them, if you let them have any 🙂 I really hope you like these, my family love them and they are a great pick me up when ever you need one 🙂

White Chocolate and Orange Cupcakes

15 Jun

So everyone loves chocolate and orange! These are some extremely decadent cupcakes just waiting to be served at a summer party, filled with orange curd and topped with a lovely butter cream, no one could turn that down!!

WhiteOrangeChocoCupcakes5

Ingredients:
225g Butter
225g Caster sugar
225g Self-raising flour
4 Eggs
2tsp Baking powder
2tsp Vanilla
300g White chocolate chips
500g Orange curd

Icing:
150g Butter
Orange curd
250-300g Icing sugar

Estimated time: 60 minutes

Directions:
Weigh your sugar and butter into a bowl. Cream these together until nice light and fluffy, this will take a few minutes 🙂

Once the butter is light in colour stir in your vanilla essence. Once mixed in start adding your eggs one by one, allowing each to fully incorporate before adding the next. At this stage the mix will become very runny and start to look curdled. Don’t worry, this is fine, it will not change the outcome of the cake!!

WhiteOrangeChocoCupcakes

Once all of the eggs have been added, slowly mix in some of the dry ingredients (flour and baking powder). Carefully fold this in to the mix in stages so that you don’t allow lumps to form, and you won’t knock out as much air 🙂

Finally fold in the white chocolate chips before spooning the mix into cupcake cases. Bake these in the oven at 180c for 15-20 minutes. When they are done they will be a nice golden brown colour and a skewer will come out clean.

WhiteOrangeChocoCupcakes1

While the cakes are cooking start weighing your butter into a bowl. Start mixing this with a wooden spoon or a hand held mixer, or in a standing mixer. Just let this mix for hours :p or just until you have a really pale smooth paste 🙂 make sure you scrape the sides down every so often so that it all gets well beaten. This will probably take about 10-15 minutes.

WhiteOrangeChocoCupcakes2

Once the cakes are cooked and slightly cooled carefully cut a circle in the top of the cake and remove the middle, don’t chuck it away as you’ll put it back afterwards. Do this to all of the cupcakes but try to make sure you keep the right ‘lid’ with the right cake!

Once they have all been cut spoon about 1tsp of the orange curd (this recipe can be found in a previous blog) into each cake, you want it almost filled to the top which may call for more curd. Once filled place the lids back on the cakes so that the curd is hidden.

WhiteOrangeChocoCupcakes3

Now add the rest of the curd to the butter which by now should be really soft allowing the curd to mix in easily 🙂 as soon as the curd is mixed in start adding the icing sugar, I found it a lot less messy and easier to judge the amount by adding the icing sugar a few spoonfuls at a time. I gave you a rough measurement of the sugar because people like their icings different, some like them really sweet and others not so much and as you don’t need to pipe this icing it doesn’t have to be very thick so you can change the amount you use depending how you feel.

WhiteOrangeChocoCupcakes4

Once the icing is smooth you can ice the cupcakes I went for classic icing starting to drip over the edge of the cake but you can do what ever you feel sits the occasion best!!

WhiteOrangeChocoCupcakes6

And there you go, some extremely fancy tasty cupcakes ready to surprise everyone with their orange filling. These are wonderful for pudding or as an afternoon tea in the garden, these of course go very well with a nice cup of tea :p enjoy everyone!!

Chocolate and Sultana Flapjack

27 Apr

Just yum. These are so tasty, they’re a real ‘pick me up’ in the afternoon or when your feeling down. They are also brilliant to make with children and so good for families 🙂

ChocoFlapJack_

Ingredients:
450g Butter
100g Honey
230g Golden syrup
230g Muscovado sugar
250g Sultanas
250g Dark Chocolate chips
680g Oats

Estimated time: 25-30 minutes

Directions:

Firstly weigh your butter, syrup and honey together in a pan along with the Muscovado sugar. Place the pan on to the hobs and gently heat until everything has melted, stir occasionally to mix it all together.

ChocoFlapJack1

Whilst everything is melting in the pan you can weigh your dry ingredients into a large bowl. Make sure you stir in the sultanas and the chocolate so that they are well mixed.

Once the syrup has melted carefully pour it into the bowl of dry ingredients. Now slowly stir this all together making sure everything is covered. As you do this all of the chocolate will start to melt and it will look amazing!!!! It looks so tasty at this stage 🙂

ChocoFlapJack2

Line a baking dish/tray/tin with baking paper, try to get it to cover the sides as this will make it easier to get the flapjack out once its cooked. Once lined spoon the mix into the tray and spread out to the edges and flatten with a spoon.

ChocoFlapJack3

Place this in the oven and bake at 180c for 15-20 minutes. When the flapjack is done it will be a slightly darker brown on top and have a crust all over. Take the flapjack out and allow to cool before cutting, while it cools it will firm up.

ChocoFlapJack_

Now all you have to do is eat it, and it is so tasty it won’t be hard to do! This is a brilliant snack, filling enough to keep you going but not to make you feel fat!! Hope you enjoy this 🙂

Chocolate and Orange Cupcakes

20 Apr

These are soo tasty, like a chocolate orange in a cake, no one can say no to that!!! These are nice and simple, smell amazing and look wonderful as part of an afternoon tea 🙂

Chocolate and Orange Cupcakes6

Ingredients:
190g Muscovado sugar
190g Butter
3 Eggs
130g Plain flour
60g Cocoa powder
1tsp Baking powder
20ml Milk
2 Oranges zested

For the icing:
85g Dark chocolate
85g Milk chocolate
225g Butter
1 Orange zested
1 Egg yolk
190-250g Icing sugar

Estimated time: 1 hour and 20 minutes

Directions:
Weigh your butter and sugar together into a bowl and cream together until a lighter brown colour is achieved. This shouldn’t take too long and will become quite a smooth texture when ready.

Chocolate and Orange Cupcakes1

Once the butter is creamed add one egg to the bowl and mix in, once mixed add the other two eggs, still one at a time to reduce the mess! Once the last egg mixed in add the vanilla and stir in along with the orange zest.

Chocolate and Orange Cupcakes

In a separate bowl sift together the flour and cocoa/hot chocolate powder and then add the baking powder. Add one spoonful of this mix to the cake batter, carefully fold it in trying to reduce any lumps. Keep adding the flour, folding it all carefully in until all is mixed. To this now add the milk and fold that in.

Now using teaspoons or an ice cream scoop start spooning the mixture into the cases. Placing the cases in muffin tins prevents any from falling over or becoming weird shapes 🙂

Place the cakes in the oven and bake at 180c for 10-15 minutes depending in how deep the cakes are. Once cooked (they should be light and spring back when lightly pressed, or use a skewer test) all to cool on a rack before trying to ice.

Chocolate and Orange Cupcakes3

While the cakes are cooling you can start the icing. In a bowl weigh both types of chocolate and place over a pan of warm water. Gently heat the water and stir the chocolate, this will melt gradually. Once melted take off the heat and allow to cool a bit.

Whilst the chocolate is cooling weigh your butter into a bowl and beat until soft, add the zest to this and mix in.

Chocolate and Orange Cupcakes2

Once the butter is really soft and fluffy add in the egg yolk(this will help the icing be glossy), mix this in as well.

Now add the icing sugar, add this a small amount at a time (unless you are using a standing mixer) so that you don’t create huge lumps and can judge how much icing sugar you need.

Chocolate and Orange Cupcakes4

Once the icing sugar has been mixed in and the icing is quite thick slowly stir in the melted chocolate. This should just be wam enough now, too hot and it will melt the icing but obviously the chocolate will set if too cold!

Chocolate and Orange Cupcakes5

Once the chocolate has been mixed in you can start icing the cupcakes in what ever way you want. If you want to pipe shapes and the icing is slightly too thin then you can just add more icing sugar until you have the right consistency needed 🙂

Chocolate and Orange Cupcakes6

And eat 🙂 they are really really tasty and will not last long in any house, no matter how determined people are these are addictive! These are also great to make with kids, a good way to keep them busy and having fun! Enjoy everyone, hope you like these 🙂

Malibu and White Chocolate Cookies

23 Mar

Sounds shocking doesn’t it?! Well unfortunately it’s not! The Malibu just adds a wonderful flavour to the cookies, and cookies as we all know are the perfect snack to munch on 🙂

MalibuWhiteChocolateCookies4

Ingredients:
150g Butter
260g Caster sugar
1 Egg
1/4tsp Vanilla essence
300g Plain flour
1tsp Baking powder
1tsp Bicarbonate of soda
250g White chocolate chips
50cl Malibu (2 shots)

Estimated time: 40 minutes

Directions:

As we all know biscuits are very nice and very easy. Weigh your butter and caster sugar into a bowl and carefully cream together. This will take a it longer than usual as there is a much larger quantity of sugar than butter. Don’t worry if it doesn’t all come together like a sponge mix does, but you will be able to see a difference in colour and it will start to clump together once the sugar is mixed in.

MalibuWhiteChocolateCookies

To this add your one egg. At this stage you will be able to beat the mix (once the egg is mixed in, not before!!) making sure there aren’t any lumps. Now mix in the vanilla as well.

MalibuWhiteChocolateCookies1

Weigh your flour, baking powder and bicarbonate into a bowl and carefully fold it into the mix. Don’t worry when you get to the end as it won’t all mix in. When you get to this stage you can add the Malibu which will allow the rest of the flour to mix in. Finally add in the chocolate chips and stir in.

MalibuWhiteChocolateCookies2

Now you can spoon the mix onto a lined tray, make them quite far apart as they spread a lot! Bake these at 180c for roughly 10-13 minutes. They should be golden in colour when they are cooked and a bit gooey in the middle.

MalibuWhiteChocolateCookies3

Enjoy these with tea, coffee or even just cold weather!!! They are pretty damn amazing cookies and so easy to make. This is something for everyone to enjoy!!